


Setup Supabase with Nest.js
How to use Supabase's Auth and Client in the Nest.js application


❗️⚠️ Disclaimer
This article is created for Supabase v1 and seems not to work with v2 due to the depreciation of some auth methods. I will create a new article for v2 and leave it here. If you have already found a solution — let me know in the comments! Thanks!
🤓 My expectations from You
You know what the Supabase is
You know the Nest.js framework
You will google what is beyond this tutorial if needed
🤔 My use case for using Supabase in Nest.js
I needed a polling mechanism that runs every 1 second and does some action. As Auth and DB, I have chosen to use Supabase cause I have seen some tutorials and wanted to try it out.
At first, I wanted to use Next.js and Functions to do those operations by Cron Jobs, but it happens to be that the minimal time frame for Cron Job by Github(as the most accessible Cron provider) is only every 5 minutes.
So I switched to the idea of a server(full) app with Nest.js. (want to deploy on Heroku)
🧑💻 How to use Supabase and Nest.js
There is one single example of how to use Supabase as Auth library for your Nest.js application, but:
it didn't seem straightforward (actual implementation) to me, and I didn't want to use an external package
it doesn't work as I wanted - it didn't have Supabase Client exposed from within the lib
*it is still a good entry if you have never used Passport and need an example - it helped me to understand what to do in my code, so thanks hiro1107 :)
📑 examples: supabase.com/docs/guides/examples
🧑💻 Github: github.com/hiro1107/nestjs-supabase-auth
So I have decided to implement my way for Auth and Client.
Could we use Supabase on the Node.js back-end?
In general, like Firebase, Supabase is a client-side tool that works from the client-side by providing the "anon" user with Row Level Security Policies, but it doesn't force us to use Supabase only on the client-side.
With some rules, we can freely leverage the power of Supabase in our Node.js Server.
🍴 Supabase basic setup
There are a few key points that I want to mention before the code.
RLS Policies
Enable it when you create tables
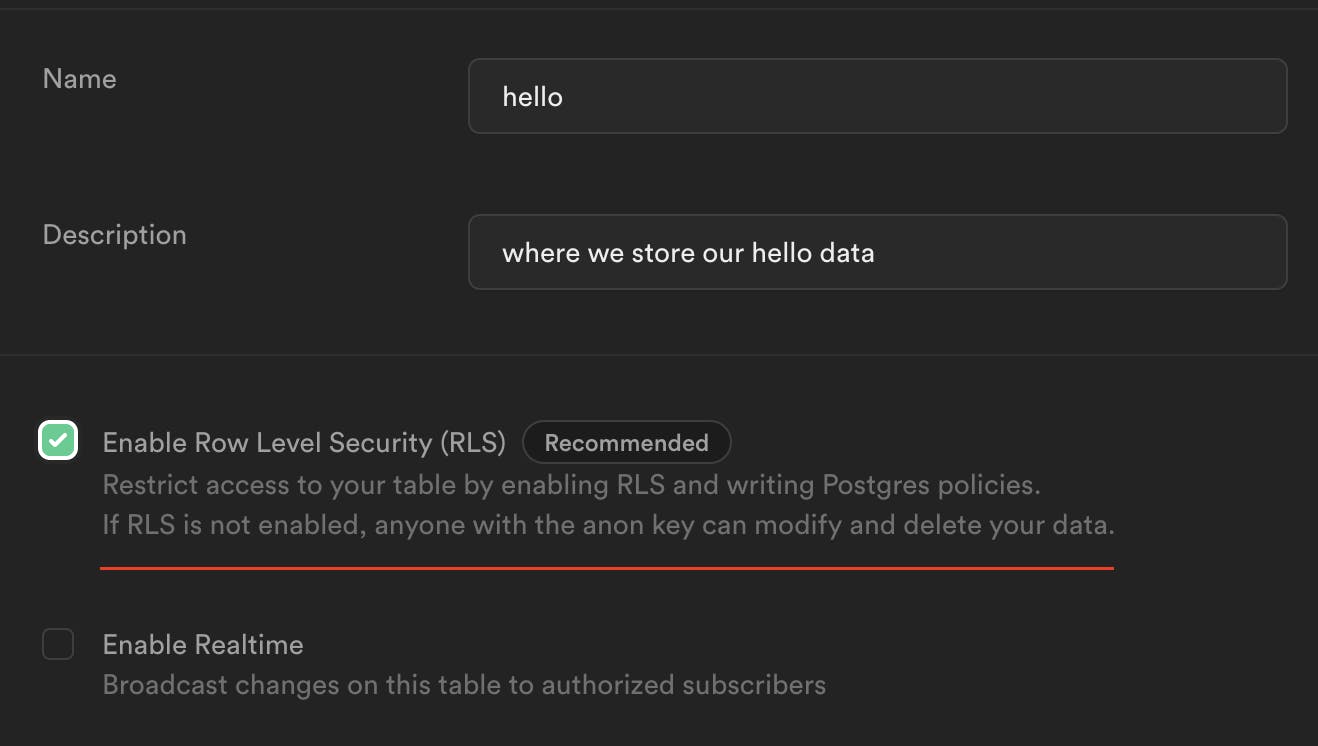
I recommend creating two by default:
"anon" is rejected by default for ALL actions
ALL actions are only could be done by auth.uid(), if your app is "user-oriented"
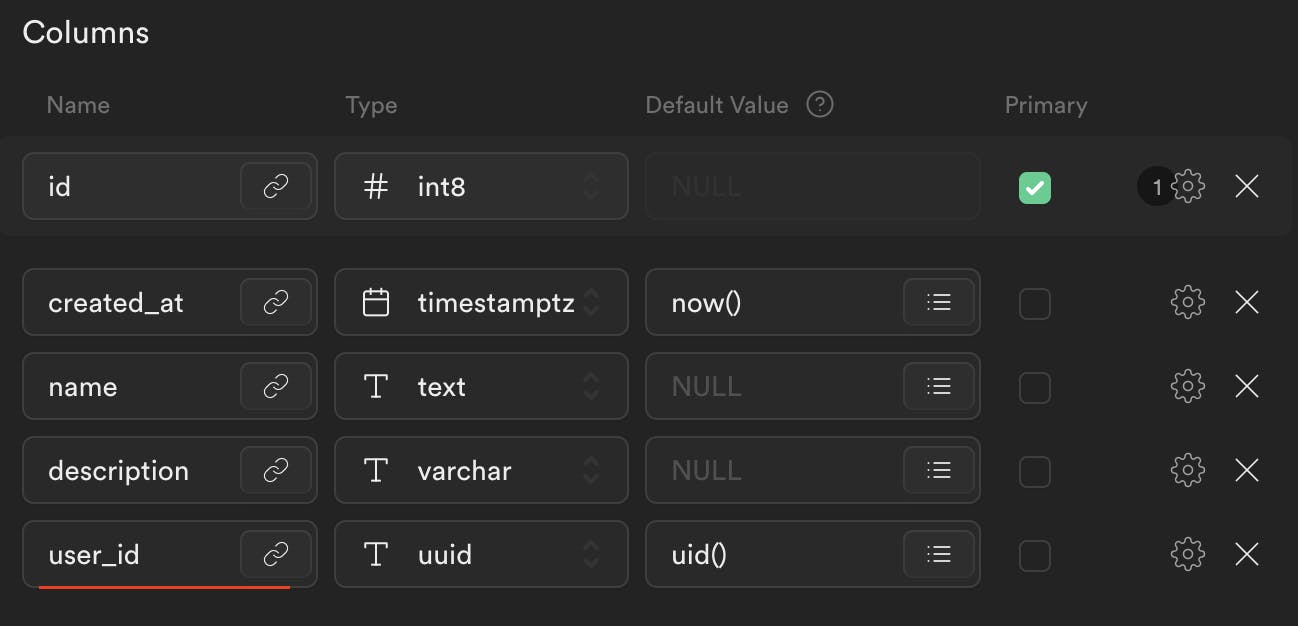
user_id
To make your application work with previous policies, don't forget to create the user_id column on each table that you use: it should be NOT null auto-generated auth.uid() field, so in this way, Supabase will always append the correct user to a row.
You can bypass RLS with Service Keys if needed, but be careful.
🐱 Nest.js application
Installs
To make this work, we need to add a few libs in addition to Supabase:
npm i passport passport-jwt @nestjs/passport @supabase/supabase-js
passport - handles everything related to Auth, does it magic that we don't need to care about
passport-jwt - has a ready-to-use Strategy for JWT Auth
@nestjs/passport - Nest.js's module for Passport
How JWT Auth works with Passport
How JWT Auth works go beyond this article, but there are plenty of explanations for using Passport and passport-jwt in Nest.js. You can start by checking Nest.js's Authentication.
What we need to know for our case: Supabase is JWT-based authorization, which handles everything on its side. On our side, we need to have the correct SUPABASE_JWT_SECRET, which is used to decode JWTs. (located in Settings -> API)
Supabase folder
🔗 Link to folder
This is the main code you could copy to your code base, and it will just work. The module is a regular Nest.js module. Other files deserve a deeper look.
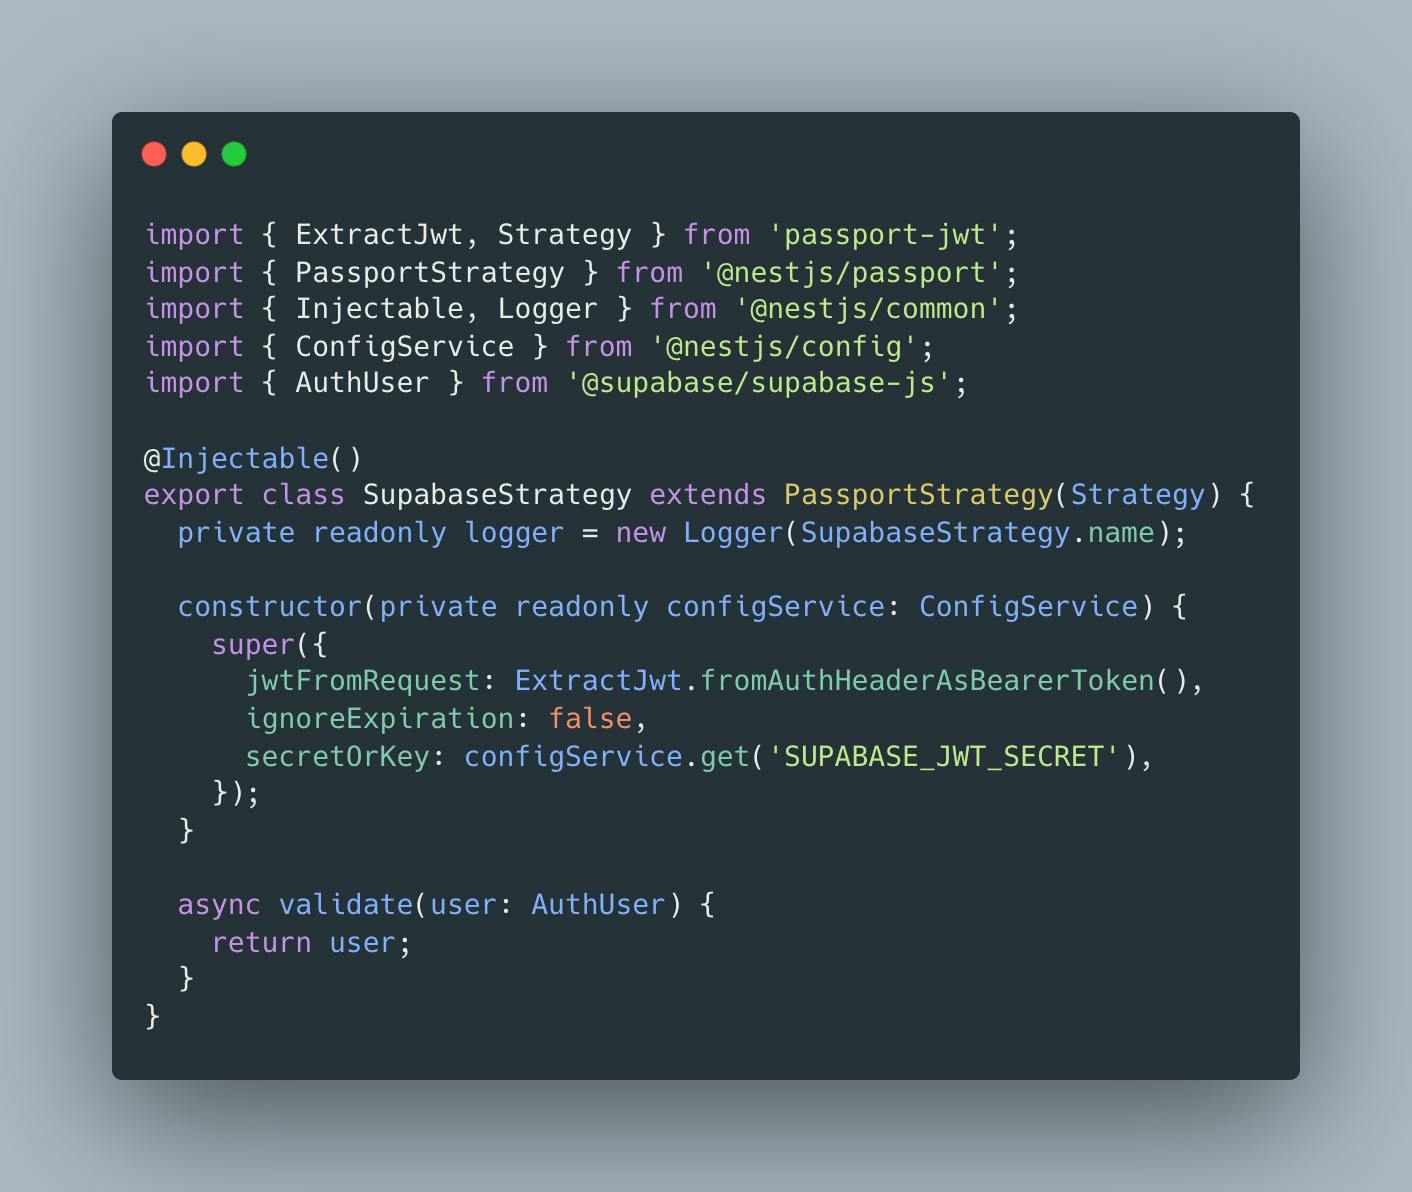
Strategy
Passport has a rich ecosystem of strategies that implement various authentication mechanisms. While simple in concept, the set of Passport strategies you can choose from is large and presents a lot of variety
Such as Supabase is JWT, we will use a ready-to-use passport-jwt strategy that does all decoding and other things for us.
In this code, we extend PassportStrategy with JWT Strategy and pass config in the super call.
strange "extend" PassportStrategy(Strategy) is TypeScript Mixins
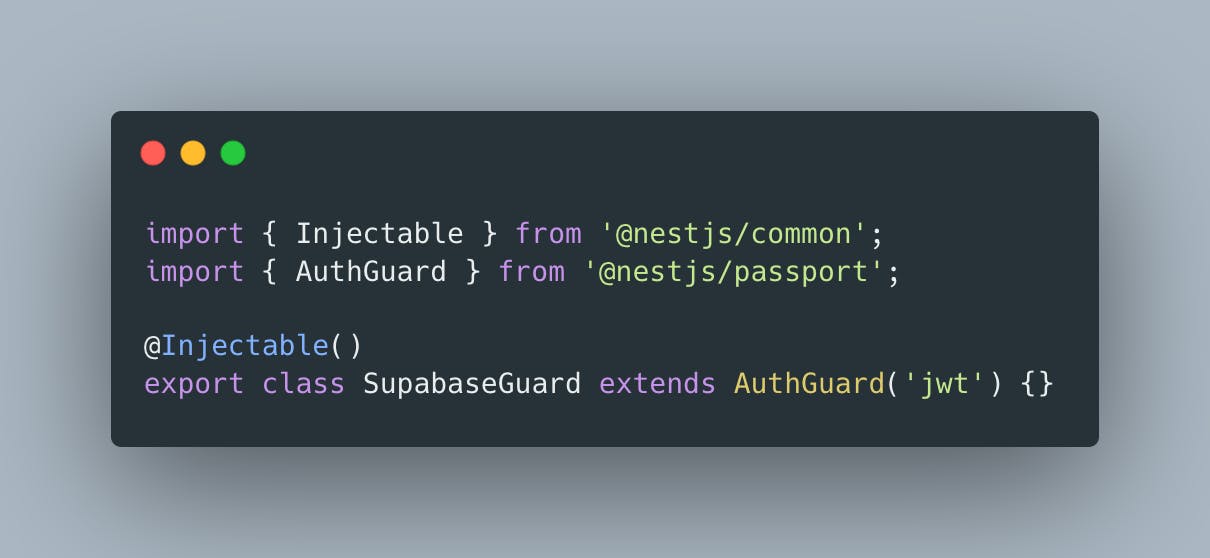
Guard
With this guard, I have protected the whole application by providing APP_GUARD in app.module.ts - a global way of guarding. You could use UseGuard for routes that need to be protected.
Here we extend AuthGuard with the jwt strategy(this is how passport-jwt named Strategy under the hood). Easy.
Service: Scope.REQUEST
This service will createClient for every request and setAuth, so we will have the correct user during all following service calls. Code implemented in "Singleton" manner so we will get the same instance in different places during the same request.
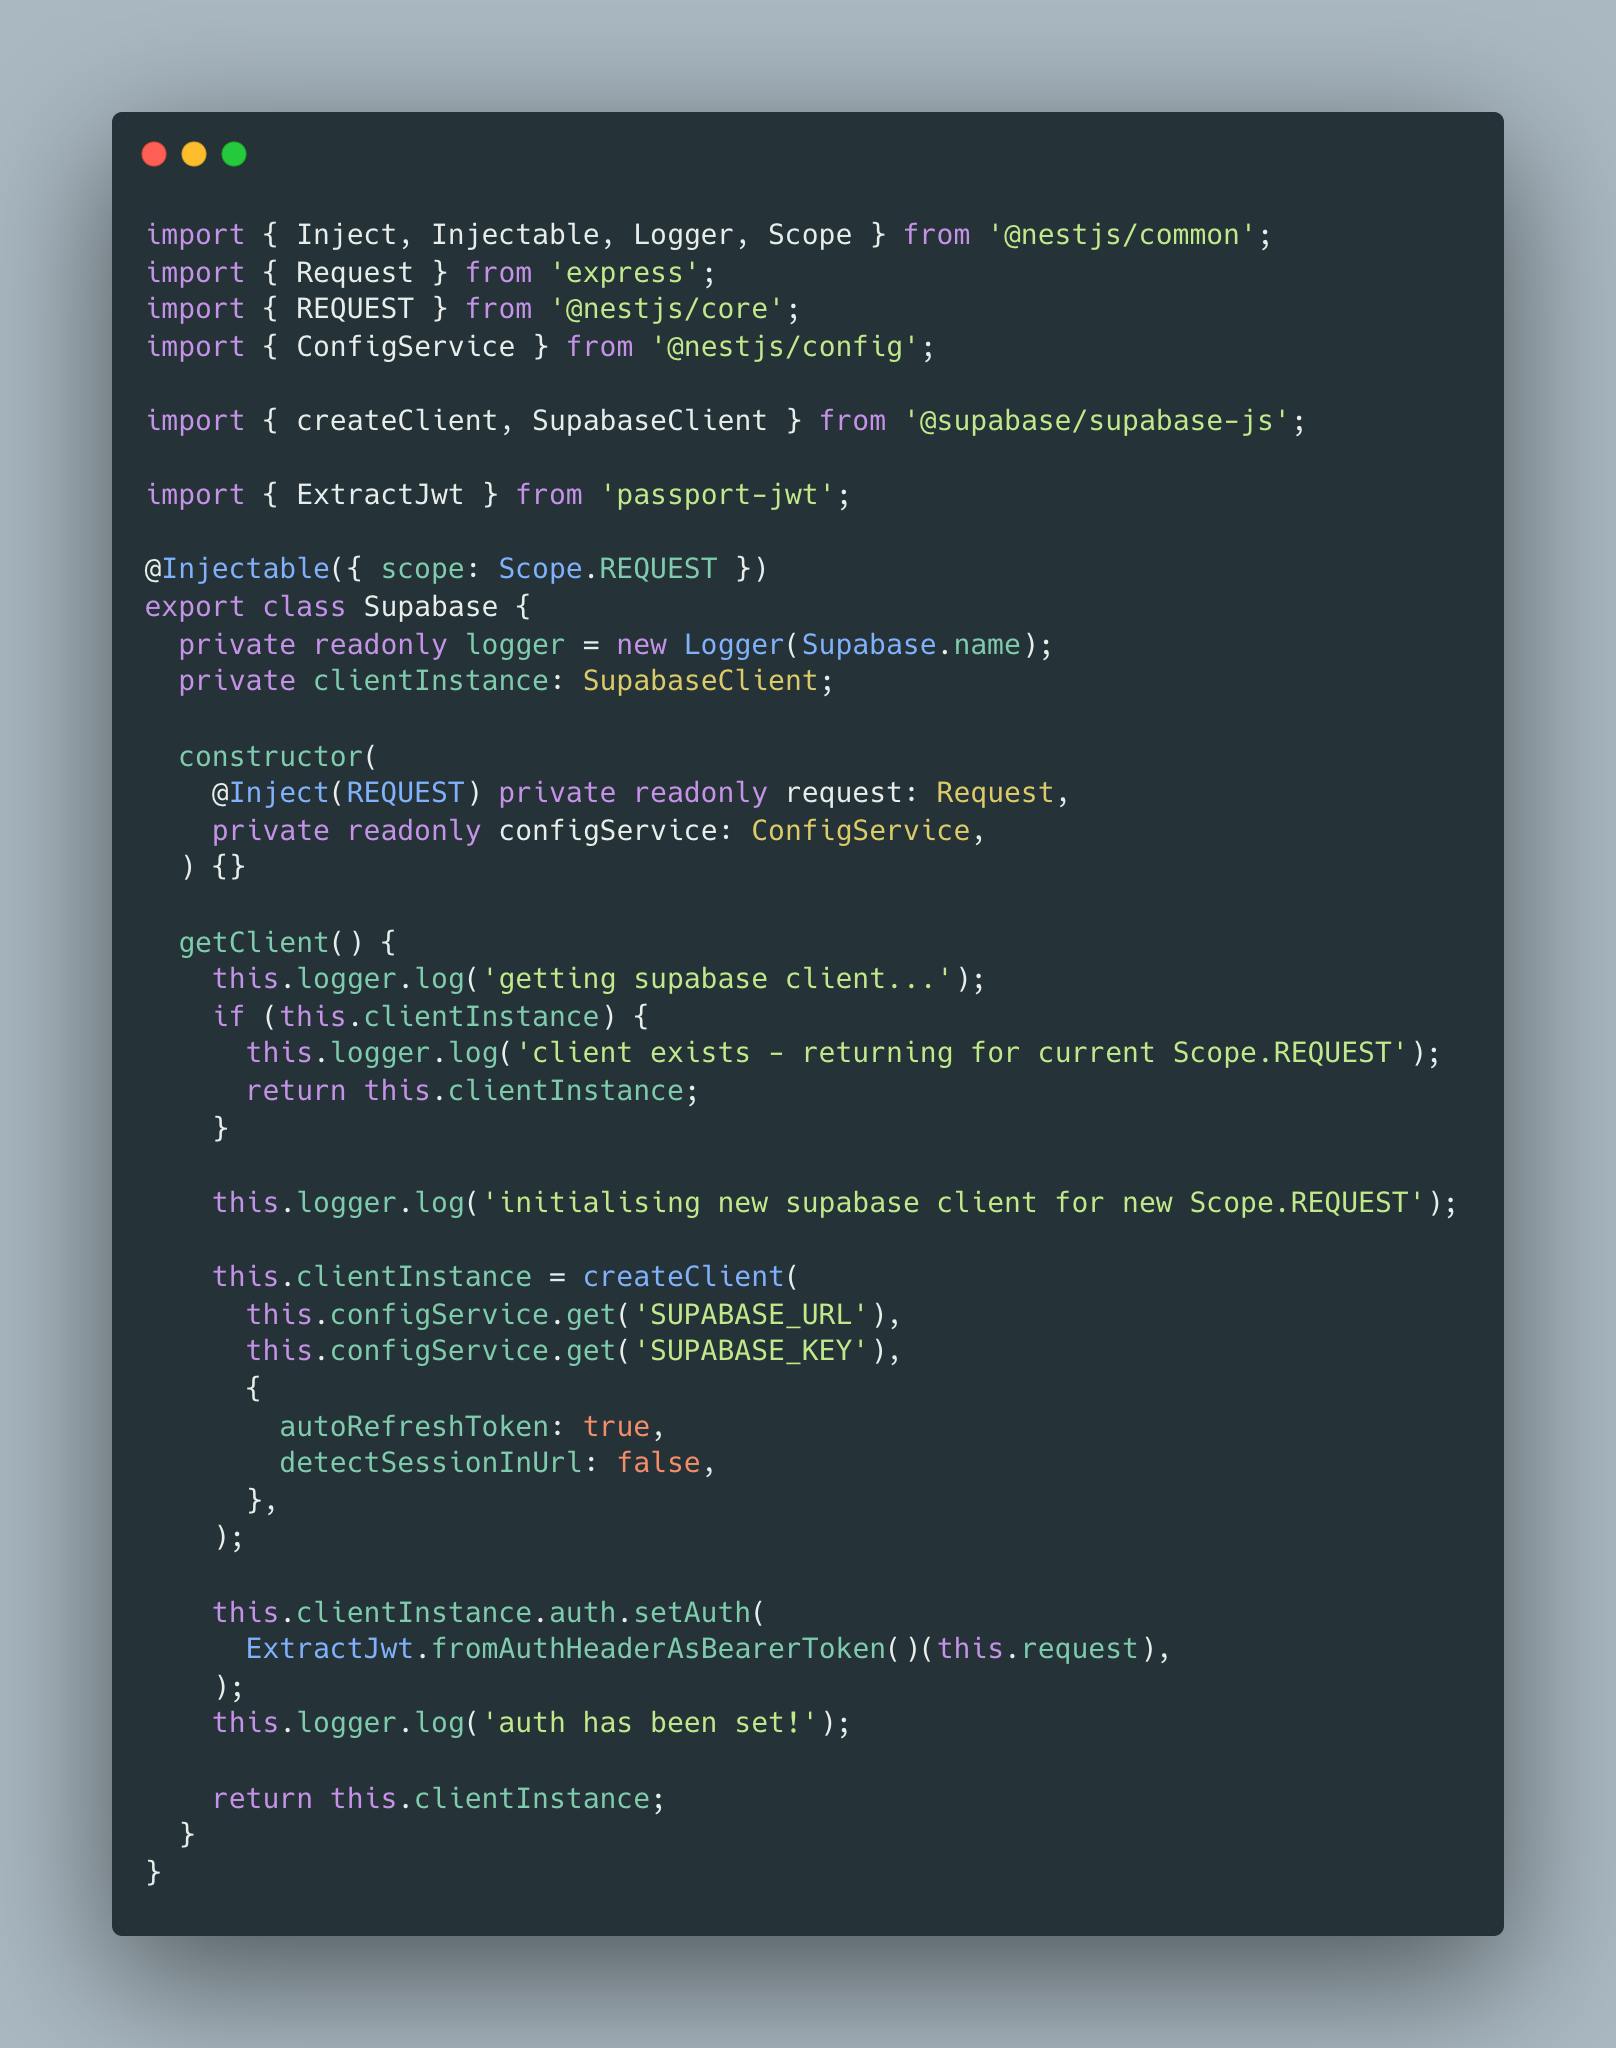
Why?
Here comes an interesting part that happens with different libraries that hold client-side states:
If we use client-side libs that hold state per user, on server OR SSR apps like Next.js, we need to be careful with those, such as it could be that when we create an instance of a library, it could become available for everyone who calls server/SSR apps.
That is why it is essential to use @Injectable({ scope: Scope.REQUEST }) so our Supabase createClient will be created per request, and we will set auth correctly.
Another example: Next.js & SSR with react-query

Disclaimer: I haven't tested it for multiple users yet, but I am pretty sure about it. I haven't found other ways to pass Auth with one Client in docs by appending access_token - only setAuth to Client directly.
Possible solution: Supabase could tweak auth flow, where with a unique setup, we can pass users in each request. With the Passport, we have the user in req.user and can still access the Authorization header for access_token.
📭 Testing with Postman
After everything is finished - let's try to call our server.
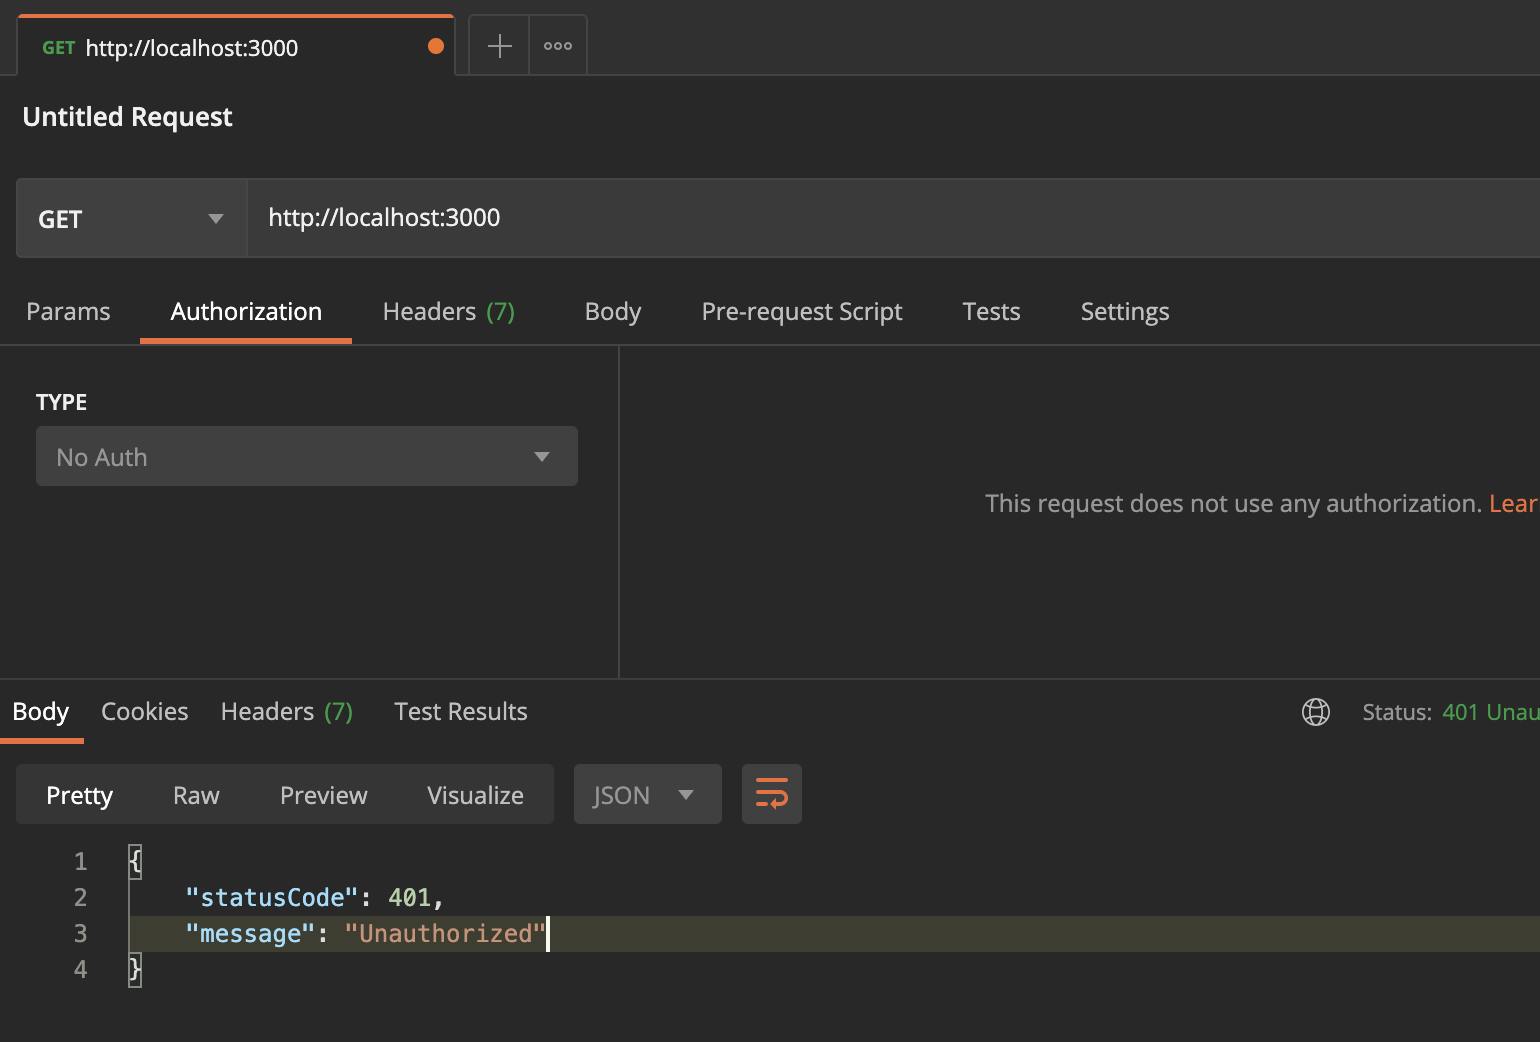
As expected, we get a 401 code - this is passport.js does it check for JWT in our SupabaseGuard
Let's now get a valid access_token and repeat the call:
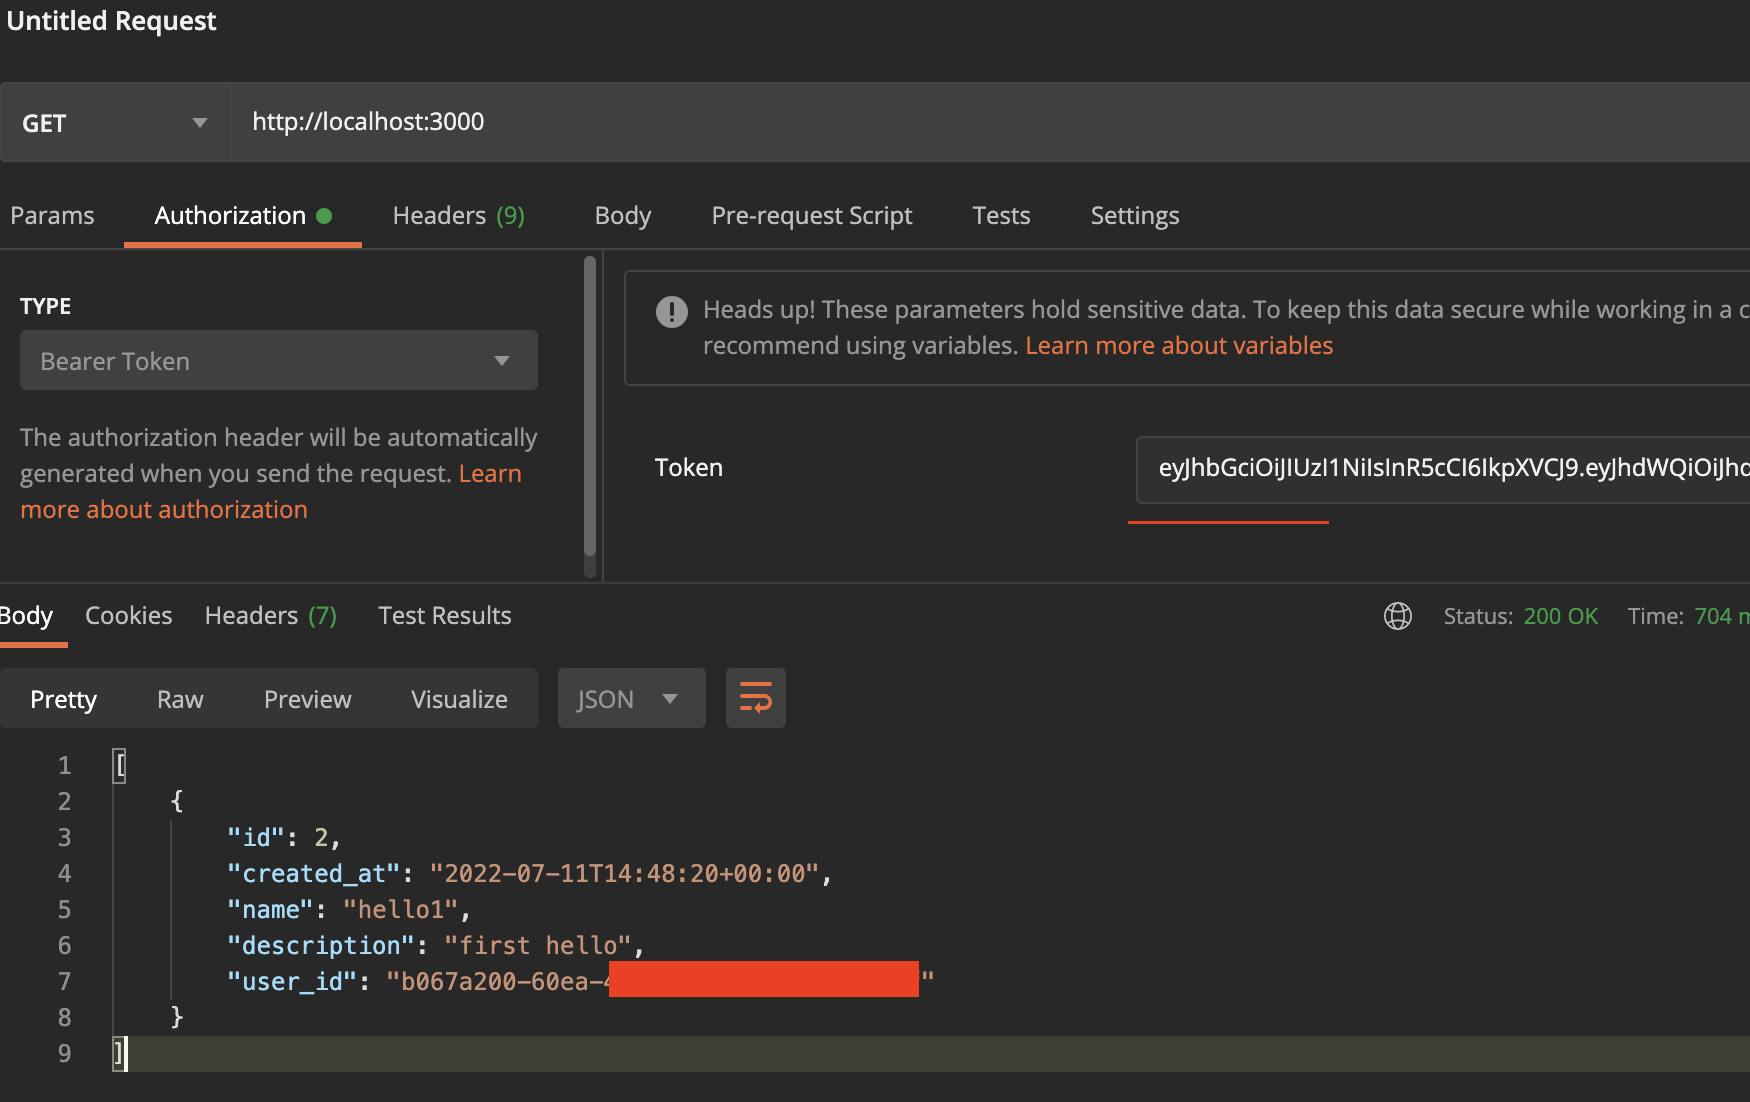
💪 💪 💪
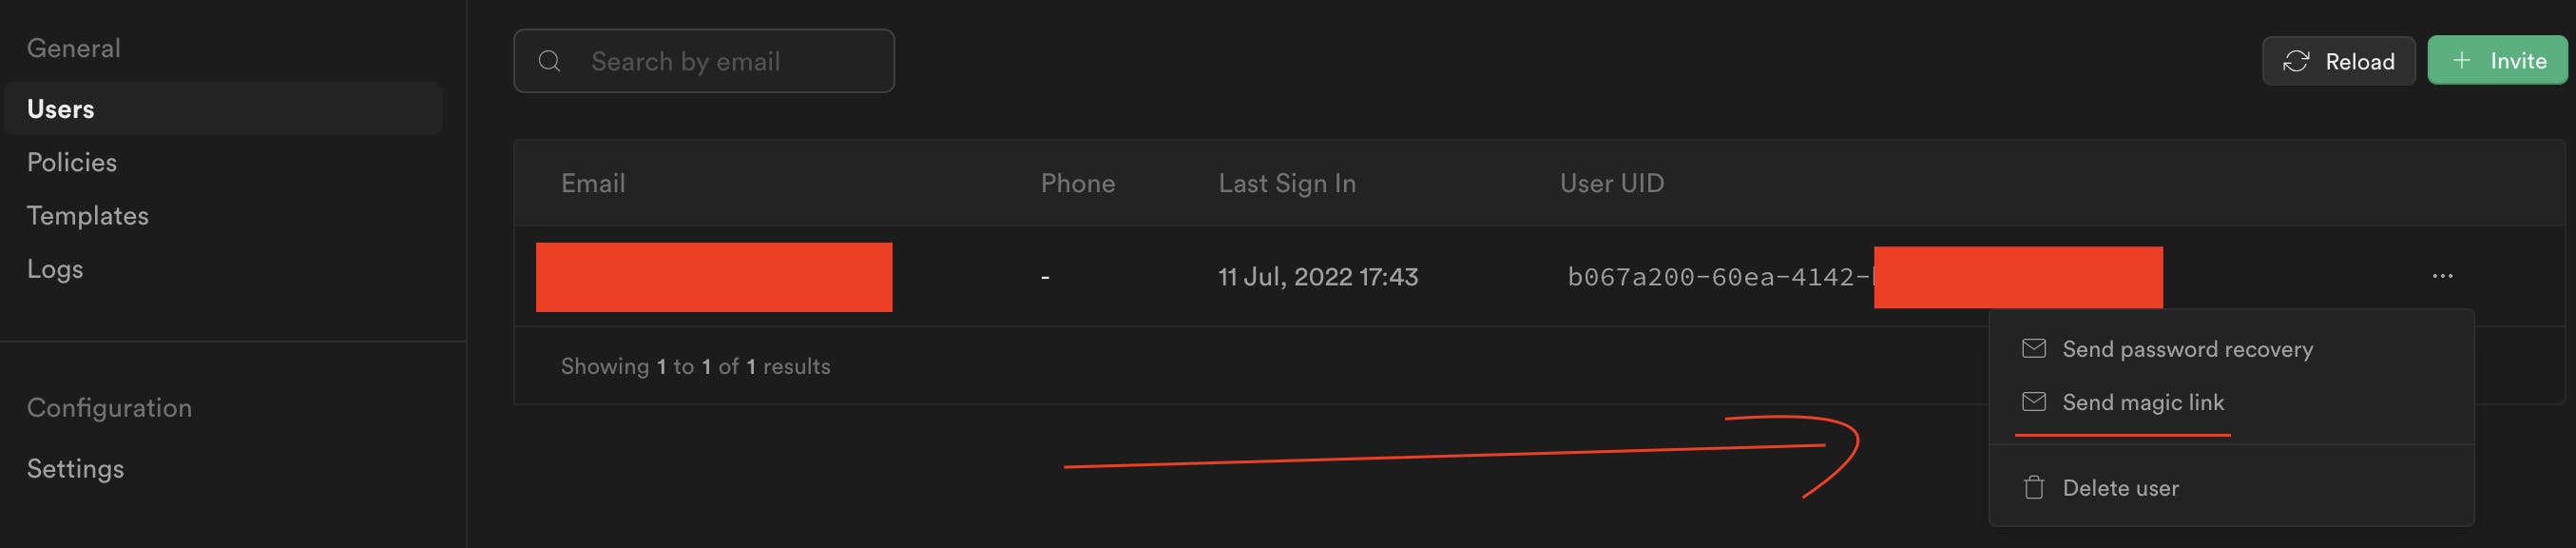
access token available after you log in with a user. In my case, I have just sent "Magic Link" and got acces_token from the URL
📋 Summary - TL;DR;
install required dependencies
copy supabase folder to your project
add 3 SUPABASE_* variables to .env
import supabase.module: in app.module / @Global() auth.module / etc.
provide global
APP_GUARDor use it where you need it withUseGuarduse supabase.ts in other services by
this.supabase.getClient()for Supabase calls
🔗 Links
Nest.js's Authentication, including JWT with Passport.js
How to use Guards in Nest.js
Supabase's Auth example app with Nest.js
Link to Medium's copy of the article
Thanks for reading!